Saturday, September 11, 2010

Blog Redesign

I just wanted to let those out there that actually read this blog that changes are coming to it. I'm going to give it a whole new look and most likely be changing the domain name and address as well.

Mainly I'm doing this because I want my photography blog to correlate a bit better with my new Etsy shop that I will be opening soon to sell my photos.

So look for new changes soon!

Wednesday, August 25, 2010

Gradients: An Example

I've been using Adobe Photoshop Elements for about a year and a half. Everyday I learn something new and how to make my pictures better.

I know you guys have heard me recommend the Photoshop Elements book by Scott Kelby and I'm here to sing its praises again.

I'm always looking to punch up my landscape photographs. Often beautiful landscapes aren't quite enough and don't always translate to film as I see them in my mind. Enter adding gradients to your picture. I can't really explain gradients as well as the experts so I'll let you google that and hear it from a better source than I.

However, they can do a lot for your photograph.

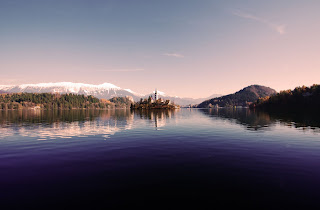
Exhibit A: A photo of Lake Bled. Pretty, but lacking something.


Exhibit B: After I've adjusted the contrast, saturation, added two gradients to the top and bottom of the photograph and also added a colored photo filter through Photoshop.


It never fails to amaze me what you can do through Photoshop!

Monday, May 10, 2010

Irritation

One thing with photography that really gets under my skin is when people complain about photographers using Photoshop.

Honestly, I've never met or seen someone's work in this day and age who doesn't use some form of photo editing.

I'm part of a forum and one of the topics was being allowed to use Photoshop in a weekly photo contest we have on the forum.

Here are a few statements I made, followed by an ignorant opinion (sorry, but it is) about photography and Photoshop. Both of which this person knows NOTHING about.

Me:I may be in the minority with this opinion, but I don't understand how photoshopping a picture somehow negates camera skills.

I think there is a point of taking editing too far, but I think a lot of people are under the impression that a crappy picture can be made magnificent with Photoshop. I disagree. I use Photoshop to make good pictures even better. Not to cover up shoddy camera skills.

Her:A shot that needs photoshop editing isn't a quality shot.

If a photo needs some photoshop to give it that extra POP, you're doing something wrong.

Me:I guess tell that to every professional photographer then, because every photographer I've ever met or talked to about their work edits their photos.

Her:There are PLENTY of professionals who refuse to digitally enhance their work, believing it takes away from a photo's integrity. I do not have any respect for a photographer who does photoshop.

Me:Agree to disagree then, because I've yet to meet someone who doesn't. I personally find it unprofessional if you don't.

I just can't believe some people. Especially people who don't even take pictures!


Friday, March 26, 2010

Working With Textures

If you have Photoshop and you aren't working with textures, then you should be. They are a great element to add to your pictures for an extra "kick".

Shadow House Creations has some great textures and tutorials on how to use them. The best part? They're all free!

Check out these two pictures.

The first has been edited, but textures have not yet been applied.


In the second picture I used Shadow House Creation's textures and this tutorial to make this picture.


Check out the rest of Shadow House Creation's blog here.

Tuesday, March 16, 2010

What a Little Lighting Can Do

In all honesty, I edit almost ALL of my photos. Rarely is there a photo that I take that I don't think can be helped in some way by post-processing. Sometimes that little extra something is to adjust lighting levels or bumping up saturation to bring colors out. Sometimes it's using actions and textures to give it a whole new look.

Today I'm going to show you the same photograph, one SOOC (Straight Out of the Camera) and one that has only had the lighting levels adjusted.

The Original:


After Adjustments:


Basically my lighting trick is one I got from Scott Kelby's book about Photoshop Elements. You use CTRL-L, use the eyedroppers to choose the darkest, lightest and midtone gray colors and it adjusts for you. There's a few other details about setting up the default colors for each dropper, but if you really want to know them, just email me.


Friday, March 12, 2010

Fix-It Friday

I missed Fix-It Friday last week, so I was eager to participate this week.


I found this week's picture a little hard to edit, but I gave it my best shot!

The Original:


Fix Number 1:


What I Did: First I adjusted the levels, adjust the saturation, used Coffee, Tea, Photographys Little Perk action, screened the image and adjusted the opacity to my liking, then applied CTP Perfect Portrait Action.

Fix Number 2:


What I did: All of the above in slightly different order and then at the end added an additional CTP Sunkissed Action.


Friday, February 26, 2010

Fix-It Friday

It's time once again for Fix-It Friday!


Here is the original picture:


Here are my two favorite edits that I did:

#1


What I did:
Cropped the image,used the quick selection tool to adjust the shadows on the face and arms, inversed the selection to multiply the color of the sky, applied Coffee Tea Photography's Eye Bright Action, applied Coffee Tea Photography's Butterscotch Vintage action.

#2


What I did:
I did everything the same up until the Butterscotch Action, instead I applied Coffe Tea Photography's Vintage Blush action and unchecked the color mute selection. I then copied the layer and used the soft light to accentuate the colors. I also applied a bokeh texture from Flickr.

Hope you enjoyed!


Friday, February 19, 2010

Fix-It Friday

Time again for Fix it Friday!


This weeks original picture:


My edits:


The main thing I did for the first picture was to use the Quick Selection tool to outline the little girl and then once I copied her alone into a layer, I screened the layer, so that she was lighter than the shadows and adjusted the level so that she wasn't too bright.

I adjust the saturation, a little tweaking of the light levels and then used CoffeeShop Photograph's Butterscotch Vintage Action.

Edit Number 2:


All I did in this edit was to add two different textures to the above picture I had already edited. The textures I had downloaded from Flickr

Wednesday, February 3, 2010

Barbed Wire Sunset

I took this while at home over Christmas. I love it because it reminds me of growing up out in the country and how much I love where I grew up.

I used Picnik to edit it, but I'd like to re-edit it when my Photoshop comes in.


Tuesday, February 2, 2010

My Equipment

I've had some of you ask what sort of equipment and editing equipment I use, so I thought a post answering these questions might be a bit easier.

For starters, I use a Canon Rebel XSI aka the Canon 450D.


I highly recommend it! It's a great starter DSLR camera and you can find them for a good price.

I have 4 different lenses I use for my camera. Generally I use the kit lens that came with it the 18-55mm lens.

I also have a 70-300mm lens that is a telephoto lens. I use it a lot when I travel. It's a great lens.


Then there is the 10-22mm lens. It's for wide angle shots. It's great for crowded rooms or if I want to get a large landscape entirely in one picture.


My last lens is my newest and I find it to be the trickest. It's the 50mm f/1.8 lens. It's great for portraits and taking close-ups. I'm still working on getting good shots from this lens.


Now for editing software. I highly recommend Adobe Photoshop Elements. I'll list a few reasons why I like it.

1. It's way, way cheaper than Adobe Photoshop CS4. I just got the new version of Photshop Elements for $50...compare that to over $300 for CS4.
2. Bascially they do the same thing. Unless you are some sort of graphic artist I don't really understand the need for CS4. Not to say it's not an excellent program, because it is. But you can get the same results from Elements that you can get from CS4.

If you do get Photoshop Elements it may seem a little overwhelming at first. Get this book, I promise you won't regret it.


I call it my bible. Seriously..it's that important and it makes using Elements ten times easier for someone who has never used it before.